作者
Cendok
始于
分类:System
Tags: [ System ]
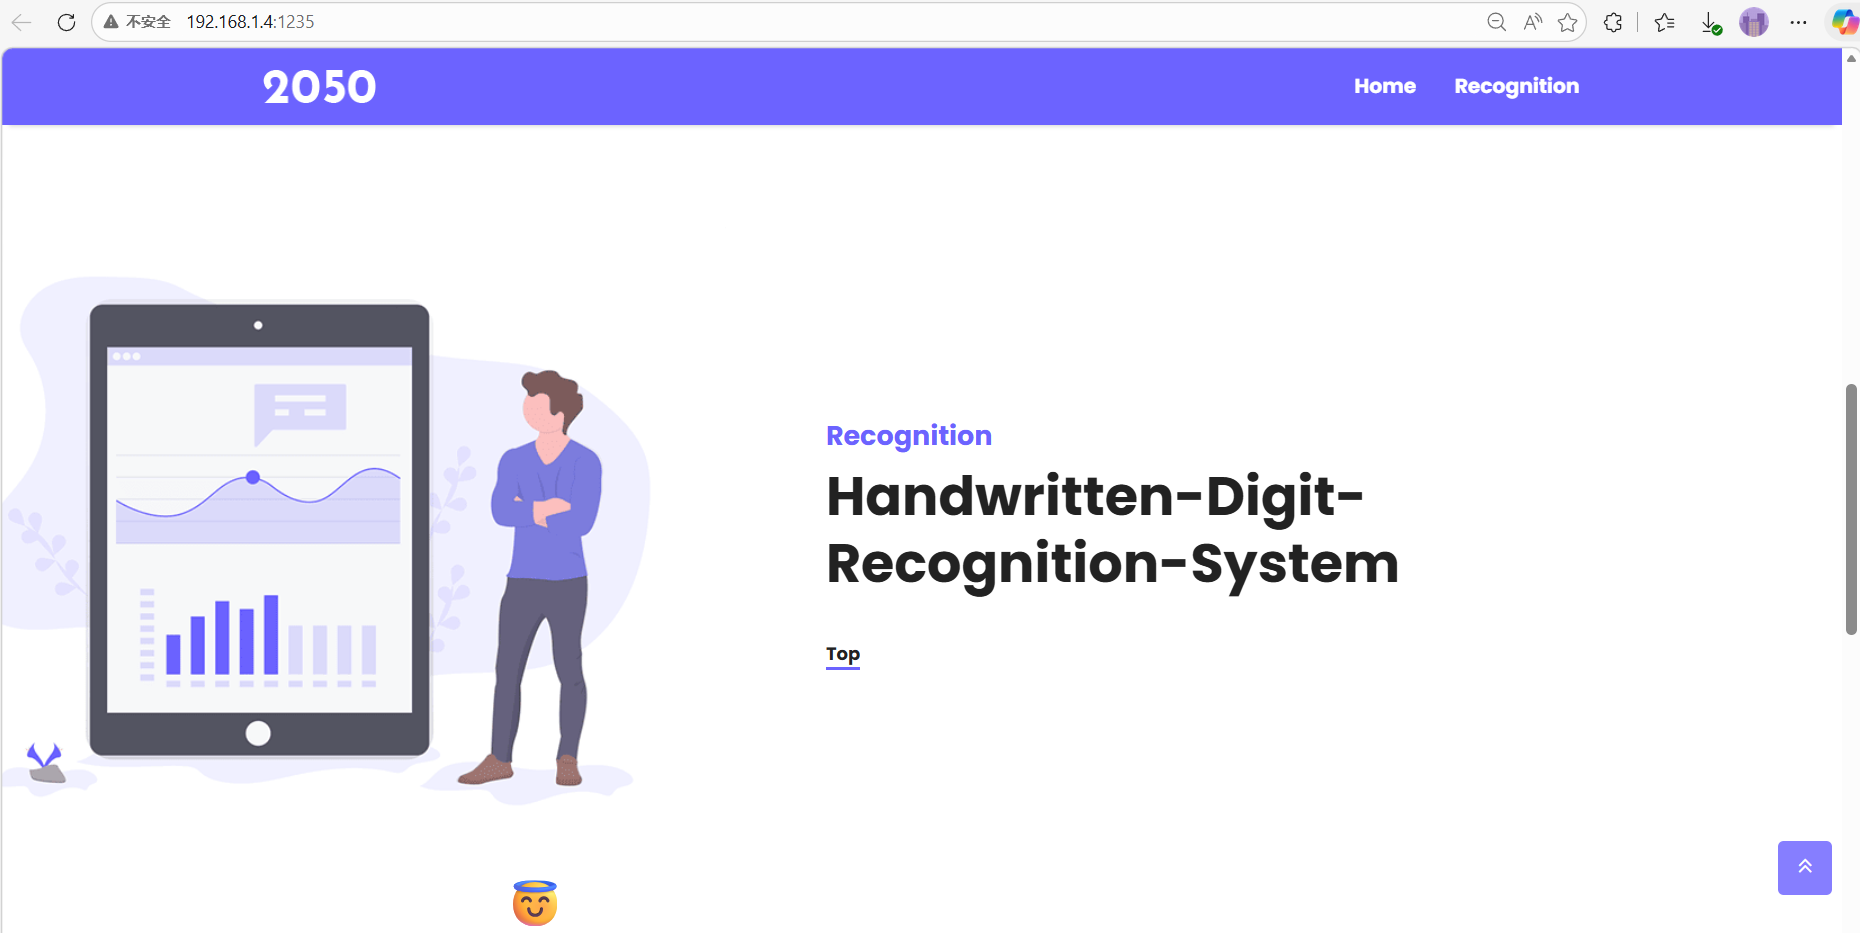
基于CNN网络和Flask框架的手写数字识别系统
始于
分类:System
Tags: [ System ]
基于CNN网络和Flask框架的手写数字识别系统
Handwritten-Digit-Recognition-System
Handwritten-Digit-Recognition-System
附上码源:
Cendok/Handwritten-Digit-Recognition-System
Pycharm中新建虚拟环境
Python3.9(Handwritten-Digit-Recognition-System)
pip install torch
pip install torchvision
pip install flask
pth.py
预先训练好模型,模型参数已上传至GitHub
添加保存模型
def save_model(model, filename):
    torch.save(model.state_dict(), filename)
    print(f"保存模型至 {filename}")

#一块用
save_model(model, './mnist_cnn_model.pth')
图像处理首选卷积神经网络,MNIST数据集压缩包已上传至GitHub
#添加这段、调整后段代码缩进,避免启动Flask同时也启动训练,不必等待训练完10轮再启动网页
if __name__ == "__main__":
    loss_fn = nn.CrossEntropyLoss()#交叉熵损失函数,订正试卷
    optimizer = torch.optim.Adam(model.parameters(),lr = 0.001)
    epochs = 10 #到底选择多少呢?
    for t in range(epochs):
        print(f"Epoch {t+1}\n-------------------------------")
        train(train_dataloader, model, loss_fn, optimizer)
        test(test_dataloader, model, loss_fn)
    save_model(model, './mnist_cnn_model.pth')

    print("Done!")
    test(test_dataloader, model, loss_fn)
app.py
#设置成能找到静态文件的路径,CSS、JavaScript、图像等,static_url_path="/static"
app = Flask(__name__, static_url_path="/static")
# predict()函数必须跟在这段下面
# 路径名称"/predict"必须跟定义的函数一致def predict()
@app.route("/predict", methods=["GET", "POST"])
@torch.no_grad()

def predict():
    info = {}
    try:
        image_file = request.files["file0"]  # 从前端获取文件
        img_bytes = image_file.read()  # 读取文件内容
        image_path = './number/digit1.png'  # 保存路径
        with open(image_path, 'wb') as f:
            f.write(img_bytes)  # 保存图像文件

        # 加载并处理图像
        digit_image = load_digit_image(image_path)
        predicted_digit = predict_digit(digit_image)  # 预测数字

        info["result"] = f"预测的数字是:{predicted_digit}"  # 返回结果
    except Exception as e:
        info["err"] = str(e)
    return jsonify(info)  # 返回json格式结果
if __name__ == '__main__':
    app.run(host="0.0.0.0", port=1235)
#app.run(debug=True, host="0.0.0.0", port=1235)
#关闭调试,否则无限循环训练,无法打开网页
index.html
html模板下载链接:
<head>
改名称
功能模块直接放在<body>内,别套壳
<section class="bg-upcoming-events">
<div class="container">
<div class="row">
<div class="upcoming-events">
<div class="section-header">
<h1>😇</h1>
<p>上传待识别的数字图像,点击预测按钮进行识别</p>
</div>
<style>
.section-header {
text-align: center; /* 使文本居中 */
margin: 20px; /* 添加一些外边距,便于视觉效果 */
}
</style>
<!-- .section-header -->
<div class="row">
<div class="col-lg-6">
<h3 style="color: black;">待识别图像</h3>
<div>
<!-- href="javascript:;"-->
<input href="javascript:;" class="btn btn-default" tabindex="0" type="file" name="file"
id="file0">
</input>
<p></p>
<img src="" id="img0">
</div>
</div>
</div>
<!-- .col-lg-6 -->
<div>
<!-- style="margin-top:20px;width: 35rem;height: 30rem; padding-left: 20px"-->
<input class="btn btn-default" type="button" id="b0"
onclick="test0()" style="color: #000000"
value="预测">
<p></p>
<pre id="out">点击预测获取识别结果</pre>
<!-- <pre id="out" style="width:320px;height:50px;line-height: 50px;margin-top:20px;"></pre>-->
</div>
<!-- .row -->
</div>
<!-- .upcoming-events -->
</div>
<!-- .row -->
</div>
<!-- .container -->
</section>
Javascript用模板自带的别改
<!-- All js here -->
        <script src="../static/js/modernizr-3.5.0.min.js"></script>
        <script src="../static/js/jquery-1.12.4.min.js"></script>
        <script src="../static/js/popper.min.js"></script>
        <script src="../static/js/bootstrap.min.js"></script>
        <script src="../static/js/one-page-nav-min.js"></script>
        <script src="../static/js/slick.min.js"></script>
        <script src="../static/js/wow.min.js"></script>
        <script src="../static/js/plugins.js"></script>
        <script src="../static/js/jquery.meanmenu.min.js"></script>
        <script src="../static/js/main.js"></script>
访问
http://localhost:1235/

默认
http://127.0.0.1:1235/
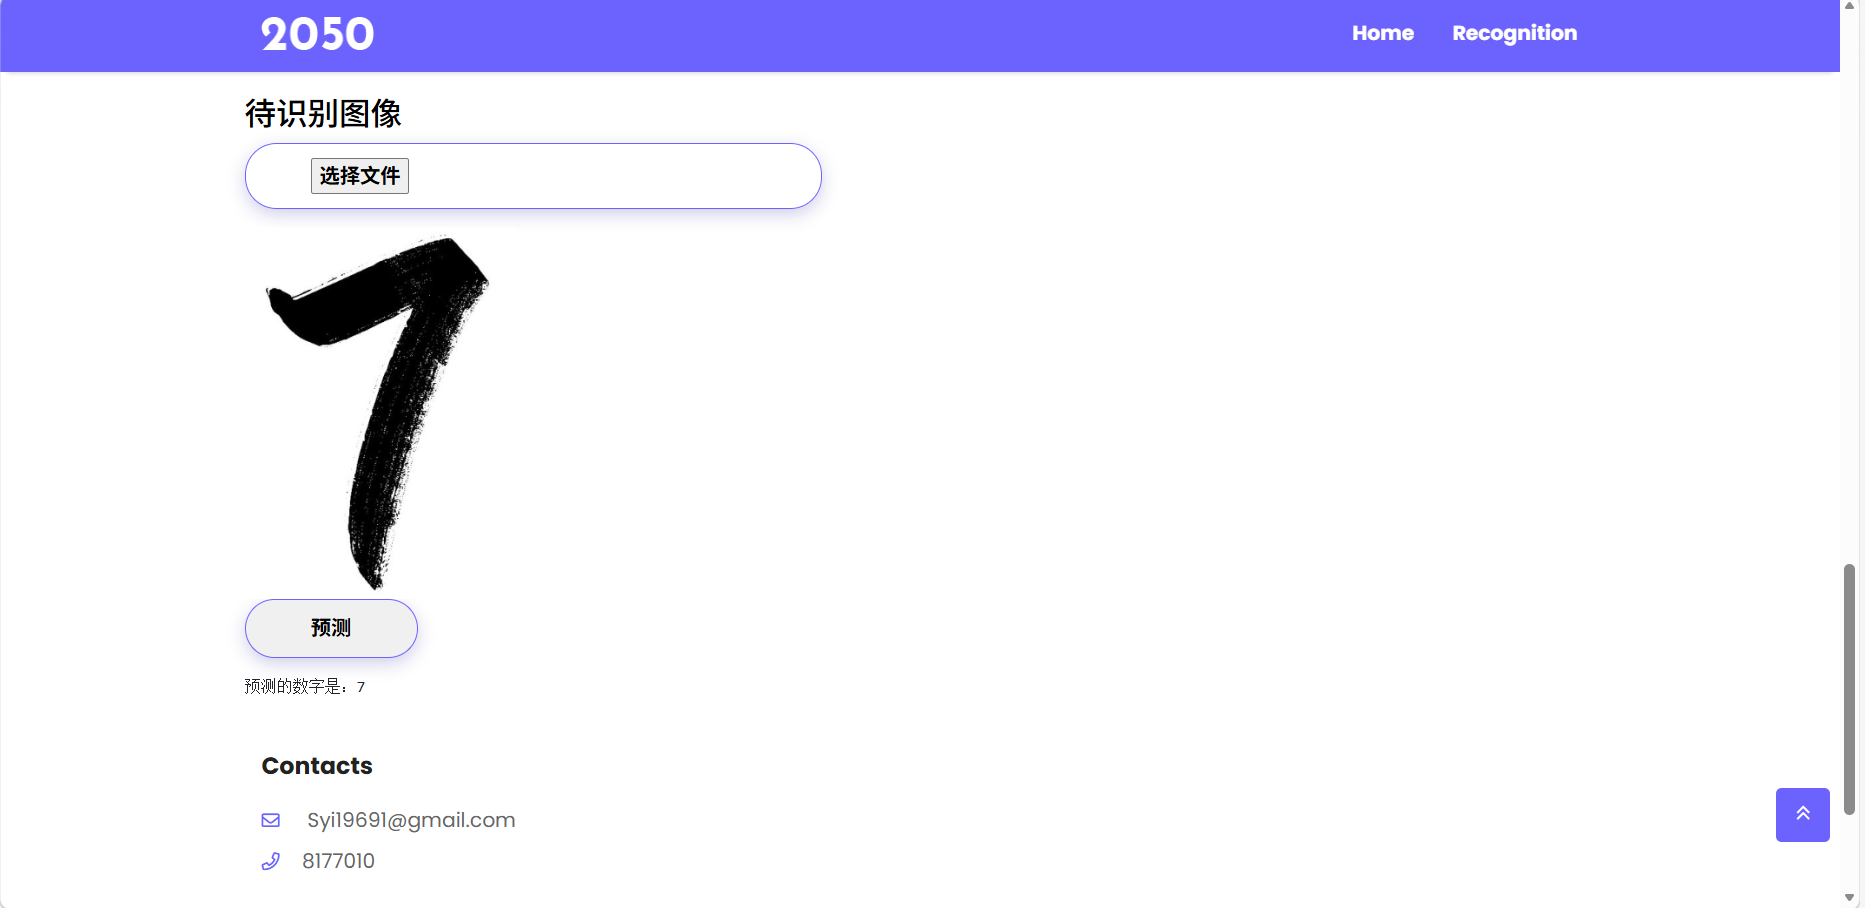
界面展示
选择number文件夹下的图片识别数字大小
移动端

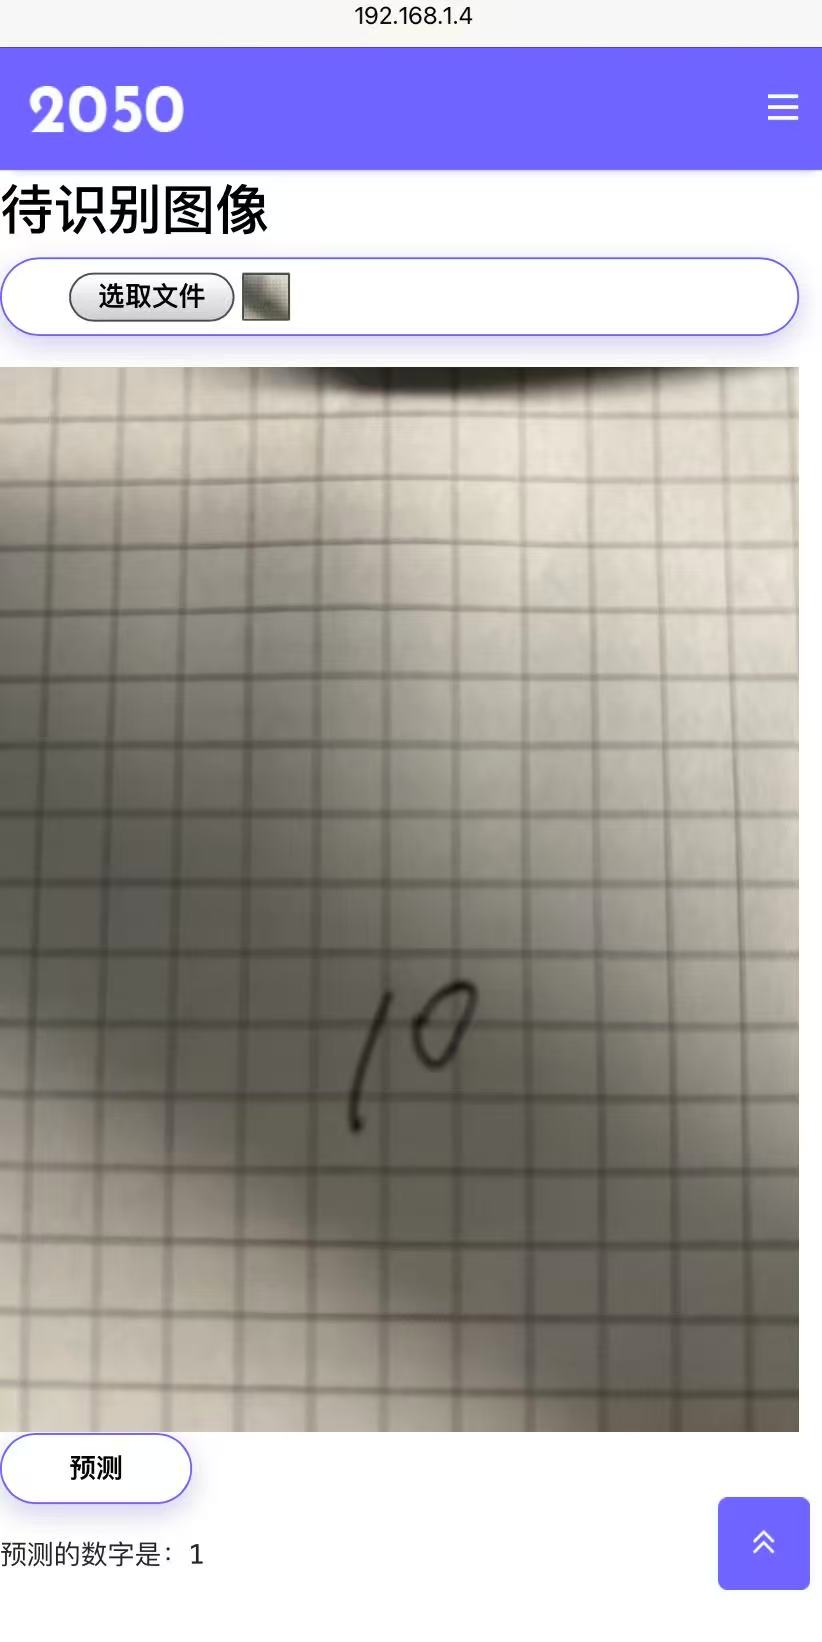
这样就实现了拍摄数字,识别数字大小的功能